Piano Fingering Guide For Major Scales
In this (reference) guide you will learn the piano fingerings for the major scales. This yields a lot of results in pattern recognition and technique, which is useful when playing the tunes you love.

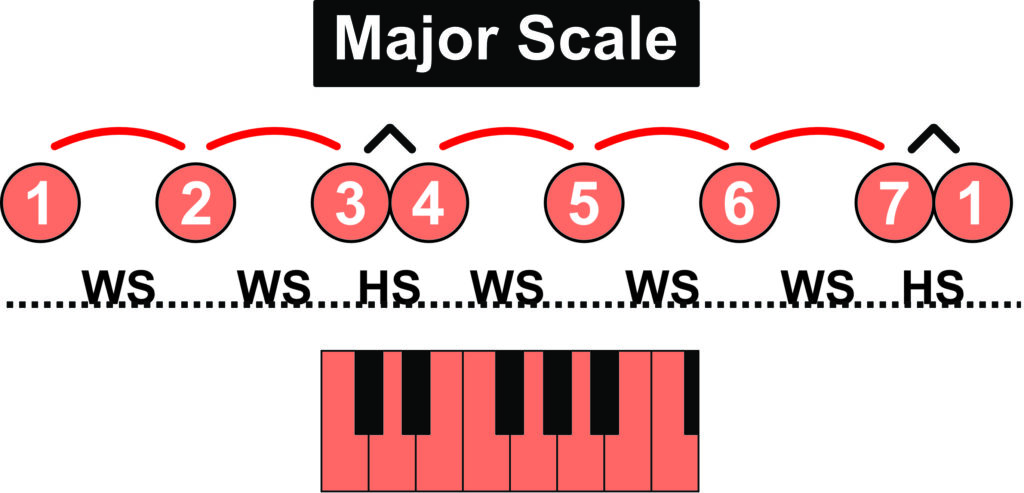
So we have the 12 major scales with the well-known pattern of whole-step and half-step intervals. From any starting point, this well-known major scale interval pattern will let us work out what keys to play on the piano. I.e. what keys are used in each scale. This will make it possible for us to create any of the 12 major scales “from scratch” and thereby learn, recognise, and memorise the particular pattern of black and white keys used in each individual scale.
You could just look at the key signature and see that, for example, the key of F (major) and therefore the F major scale has one flat (B flat) and then play through the scale without noticing the interval pattern. Though, constructing the scales from scratch using the major scale interval pattern is more beneficial.
If we just play the right keys on the piano one at a time using the index finger (as untrained children will do), then we’ll miss out on another benefit of practicing scales, which is the developed piano technique. More on technique later. First, let’s see the major scale interval pattern:
The right hand
The convention in scale fingering is to use the numbers 1, 2, 3, 4, and 5 to denote the fingers to be used in each hand. 1 refers to the thumb and 5 refers to the pinky, or little finger.
What will make it easier to learn and memorise how to play the scales is to think in terms of fingering groups, i.e. blocks of notes on the keyboard. Each major scale will consist of two fingering groups.
The advantage of the fingering group approach is that it can be adapted to play a scale from any starting point. This also applies to modal scales (aka modes), which are displaced major scales. In this way, you always know what finger to start off with. Regardless of where the scale starts and ends, the fingering groups will be the same. Though, as for the major scale, the fingering may be amended as required at the very beginning and end of a displaced scale.
The right hand ascending: Let’s start with the right hand. When playing an ascending scale, each fingering group (except the first) will begin immediately after a “thumb turn”. In this case, we will pass the thumb under the other fingers to reach a higher note. After that, a new fingering group will begin with the thumb. The C Major scale is typically fingered by the right hand as follows:
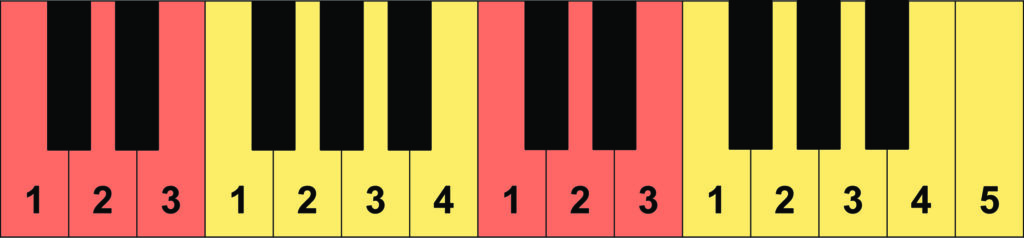
The finger numbers have been added in the image above. Also, the different fingering groups have been colour-coded.
The first fingering group uses finger numbers 1-3, and the second fingering group uses finger numbers 1-4. Though, when playing the last octave, the second fingering group also uses the pinky. It wouldn’t really make sense to end with a thumb turn. Just use the pinky. In that way, it’s also easy to go down the scale again. If we only had to play one octave, the first group would use finger numbers 1-3, and the second group would make use of the pinky and use finger numbers 1-5.
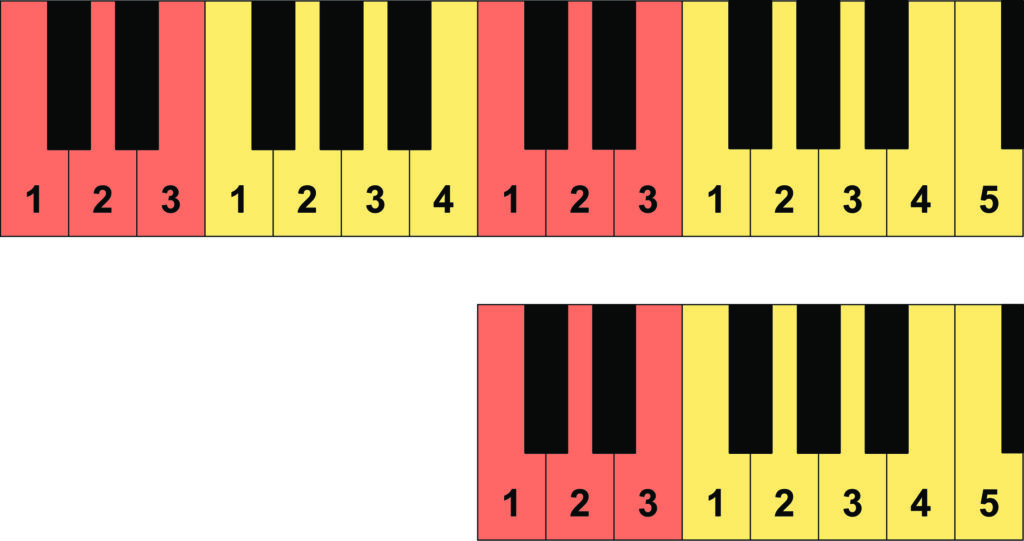
So we start off with the thumb playing the note C. During the first 3 notes (C, D, and E) we can prepare the forthcoming thumb turn by twisting our hand a little to make it very comfortable to just continue the twisting motion and let the thumb go under the other fingers to play the note F. In this way, we can always prepare the forthcoming thumb turns to make it more smooth and effortless. Here’s the C major scale in one and two octaves with fingering groups:
The right hand descending: After playing the last note C with our pinkie, we can go down the scale again using the same fingers and finger groups. This time, we’ll use a different thumb turn where, instead of letting the thumb go under the other fingers, we pass either finger 3 or finger 4 over the thumb to reach the first note in a new fingering group. Again, we use a twisting motion of the hand to achieve this.
Proper technique
As mentioned earlier, apart from pattern recognition, another benefit of practicing scales is the developed piano technique. Below are a few examples of this…
Thumb turn – passing the thumb under the other fingers
Except for the first fingering group, when playing a major scale ascending with your right hand, you’re entering each fingering group with a thumb turn. That is, you’re passing the thumb under the other fingers to reach the next note in the scale. For example, when playing an ascending C major scale with the right hand, we use a thumb turn to enter each new fingering group. So after playing the last note in a fingering group with either the 3rd or 4th finger, we pass the thumb under the other fingers to reach the first note in a new fingering group with our thumb.
Thumb turn – passing the 3rd or 4th finger over the thumb
The other type of thumb turn is to pass either finger 3 or finger 4 over the thumb to reach the first note in a new fingering group. This is used when going down the scale again with our right hand. In this case, we pass over the 3rd or 4th finger to reach the first note in a new fingering group. For example, when going down the C major scale, after playing the note F (the last note in a fingering group) with our thumb, we pass the 3rd finger over the thumb to reach the note E (the first note in a new fingering group).
Fingers close to the keys
When playing scales, the fingers should stay close to the keys at all times. This proper piano technique will also be transferred to real scenarios when playing songs. Overall, playing scales is more than just recognition of interval patterns, black & white key patterns, and the sound of different types of scales. Rehearsing those scales will also result in proper piano technique.
The left hand
Now let’s look at the left hand. Here’s the C Major scale fingering:
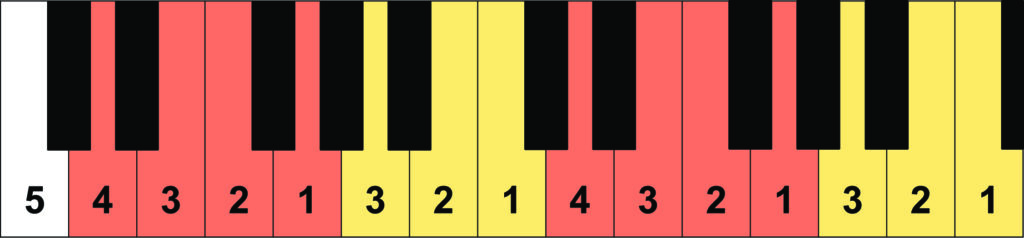
Again, there are two fingering groups. This time the scale will start with the 5th finger playing the note C. Later, the note C will be played with finger number 1. It’s just easier to start the scale with the pinky instead of having to make a thumb turn right from the start. From there we’ve got the same fingering groups as for the right hand, 1-4 and 1-3.
The left hand ascending: When the left hand is playing an ascending scale, each fingering group (except the first) will again begin immediately after a thumb turn (in this case passing other fingers over the thumb to reach a higher note) and each fingering group will end with the thumb. Again, when playing the C major scale, it is easier to use the pinky on the first note C; however, when the note C is required in higher octaves, the thumb is used. After the first C note, the fingering group 4-1 starts at the note D. After playing the note G with the thumb, the 3rd finger is passed over the thumb to reach the following note A and begin the next group 3-1. Again, when playing the note C, this time with the thumb, we will again use a thumb turn. This time the 4th finger is passed over the thumb to play the note D and begin the next fingering group. So again we have 2 fingering groups like we did in the right hand.
The left hand descending: The exact same finger numbers and fingering groups are used when going down the scale again with the left hand. On the way back we’re using the same thumb turn as we did going up the scale with the right hand. I.e. each time we’re entering a new fingering group, we’re passing the thumb under the other fingers to reach the 1st note in the new fingering group. At the end, we’re using the pinky to play the note C as that’s the easiest choice when ending the scale instead of making another thumb turn.
Fingerings and fingering groups for all major scales
Now we will list the scale fingerings and place parentheses around the fingering groups for all of the major scales. Note that some scales start with a group of three notes or less, which is actually the end part of a fingering group that repeats in its entirety later in the scale. The fingering number shown in bold type and underlined represents the tonic of the scale in question:
Right hand fingerings and fingering groups
C, D, E, G, A, and B (Cb): (1 2 3) (1 2 3 4) (1 2 3) (1 2 3 4) (1 2 etc.
Db (C#): (2 3) (1 2 3 4) (1 2 3) (1 2 3 4) (1 2 3) (1 etc.
Eb: (2) (1 2 3 4) (1 2 3) (1 2 3 4) (1 2 3) (1 2 etc.
F: (1 2 3 4) (1 2 3) (1 2 3 4) (1 2 3) (1 2 3 etc.
Gb (F#): (2 3 4) (1 2 3) (1 2 3 4) (1 2 3) (1 2 3 4) etc.
Ab: (2 3) (1 2 3) (1 2 3 4) (1 2 3) (1 2 3 4) (1 etc.
Bb: (2) (1 2 3) (1 2 3 4) (1 2 3) (1 2 3 4) (1 2 etc.
Left hand fingerings and fingering groups
C, E, E, F, G, and A: (5) (4 3 2 1) (3 2 1) (4 3 2 1) (3 2 1) (4 3 etc.
Db, Eb, Ab, and Bb: (3 2 1) (4 3 2 1) (3 2 1) (4 3 2 1) (3 2 1) (4 3 etc.
Gb (F#): (4 3 2 1) (3 2 1) (4 3 2 1) (3 2 1) (4 3 2 etc.
B (Cb): (4 3 2 1) (4 3 2 1) (3 2 1) (4 3 2 1) (3 2 etc.
Practice scales
Practising the major scales on a daily, or at least weekly basis, will help to get them “under your skin”. They will be part of your nervous system. In addition to the specific fingering groups for each major scale, you will learn and memorise the major scale interval pattern, and thereby the recognisable sound of every major scale. They will indeed sound similar due to the same interval pattern. You will also learn and memorise the different patterns of white and black keys present in each scale. Often, you can then transform the exact fingerings from the scale to real scenarios when playing songs in the same key. On top of this, you’ll learn proper piano technique like the thumb turn and having the fingers close to the keys instead of having the fingers flying uncontrolled up in the air. So practising those scales (even if you think it’s a little boring compared to playing your favourite tunes) is beneficial in many ways…
What scales do I need to practice?
The major scale is the most common scale. So you’ve already got a head start if you can play all 12 major scales. Playing the different modes is now easy as they are just displaced versions of major scales. So you just use the same fingerings and fingering groups.
Some other scales that are commonly used and therefore important to practice are the natural minor scale (and even though they are less used, you can also practice the melodic and harmonic minor scales if you wish), the major pentatonic scale, the minor pentatonic scale, and the blues scale. Then you’re really covered. You can find info on how to play those scales in old-fashioned piano textbooks or online. Below is a poster with the interval patterns of all those most used scales.

You can buy the Scale Interval Patterns poster in the shop with the particular interval pattern of major scales, minor scales, pentatonic scales, and blues scales. With this on your wall, you’ll always know the interval patterns of the most common types of scales. From there, you can work out your scales from any starting note. Combined with this post, you will also know your fingerings for major scales. Just print out the section for the right and left hand fingerings and fingering groups near the bottom of this post.
If you found this blog post valuable, you can share it below.
SHARE POST